The Foldr server includes introduces an updated powerful search function that allows users to perform searches across multiple storage locations at once. Users can search both SMB shares and the following cloud platforms with a search query: OneDrive, SharePoint Online, Teams and other locations such as Google Drive, Box and Dropbox. Alternatively, a user can select to search a specific network or cloud location individually.
By default, the search feature is disabled and must be enabled and configured by the administrator before it is available for use.
It is possible to search for files by name, filter results by modified date, or search for specific keywords within files. Foldr Search contains an optional built-in Optical Character Recognition (OCR) engine to analyse and extract text from images files, scanned documents or graphical PDFs. Third-party cloud OCR engines are also supported from Amazon AWS (Textract) and Google Vision. Visual extract options are also available to allow for hit highlighting in search results.
OCR is not required to search for keywords inside common file formats such as Microsoft Office documents, text or PDF files.
Search results for SMB shares (and cloud locations not using the service API) are returned by querying an index held within a dedicated Foldr appliance. This provides incredibly fast search results, regardless of the number of storage areas being searched. The index itself is built up from crawl jobs that may be run on a schedule. The initial crawl process of a share may take some time depending on the amount of data to be indexed, however, subsequent crawls will only index changed or new files so the index jobs will complete much faster. Cloud locations such as Office 365 OneDrive, SharePoint, Teams, Google Drive and Dropbox do not require indexing by Foldr as the server can query the cloud provider’s own search APIs.
Foldr can ensure that only appropriate search results are returned to users, based upon the shares that are available to them under My Files and by parsing the file server backend NTFS permissions / ACLs.
App Compatibility
Foldr search is available in the web, desktop (Windows & macOS) and mobile apps (iOS/Android). The desktop app’s search function is implemented using a web search view. This is available from the Foldr icon in the system tray/menu bar. Alternatively, Windows users can use shortcut keys (Win + Shift + F), macOS users can use (Alt + Space) to launch the desktop web search UI.
Search is not accessible from the native search bar in Windows Explorer or macOS Finder.
Enabling Search for Google Drive, Office 365 locations or Dropbox (Cloud Service APIs)
NOTE – Where cloud locations are being searched, the Foldr indexing server/service is *not* mandatory. Basic search functionality can be provided by selecting to use the cloud service API.
Search can be quickly enabled for cloud locations in Foldr Settings > Files & Storage > Edit share > Search & Data – Enable the ‘Show as location in Search‘ toggle and select the ‘Use Service APIs‘ option.
To provide search results for on-premise SMB shares, the files must be indexed by the Foldr server.
Where more advanced features such as OCR are required, you can use Foldr’s own index engine to process files held in cloud locations, however, it should be noted that searching for keywords inside common file types is already available with the default ‘Use service APIs’ option described below.
To enable search service to users for Google Drive, OneDrive/SharePoint/Teams or Dropbox, navigate to Files & Storage > Edit cloud storage item > Search and Data tab
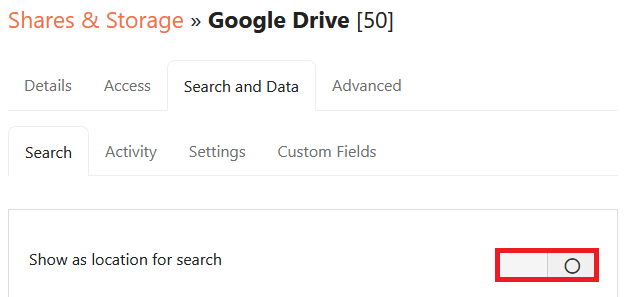
1. Enable the toggle labeled ‘Show as location for search‘
2. Select ‘Use service APIs‘ as the search type/mode
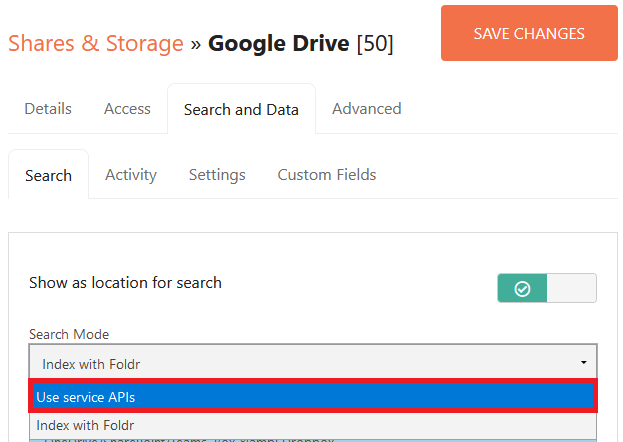
3. Click Save Changes
Search will now be available for the storage item (Google Drive in this example) in the web, desktop and mobile apps.
Please note that any new files that are created in the cloud location may not be immediately be displayed in Foldr search results until the cloud providers search has indexed the file. Google Drive for example takes a few minutes for this to take place and happens automatically.
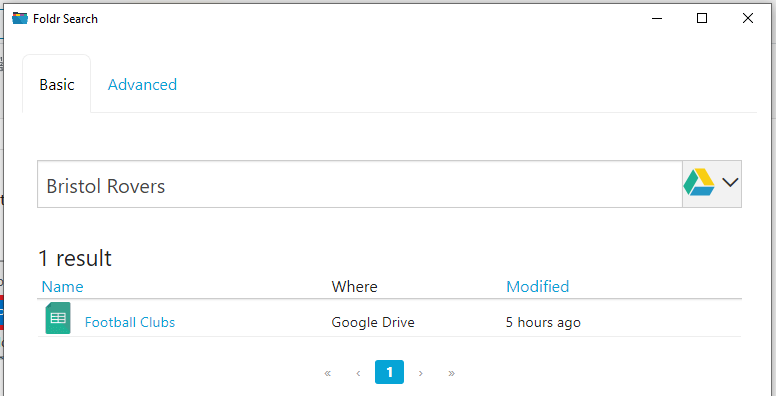
Windows app search below using service APIs to search for content in Google Drive. Note that clicking the search results Google Sheets file, will launch the browser with the file ready to edit in the corresponding Google web app.
System Requirements & Deploying a Dedicated Search Appliance
Where searching of on-premise SMB shares is required the Foldr index service must be used. The Search role can be resource-intensive both in terms of CPU and memory and as such, it is strongly recommended that a separate virtual appliance is deployed specifically to host the search indexes and perform crawl operations. If regular client access and search is hosted upon a single appliance, it may have an impact on the user experience when performing regular file access operations, even when increasing the specifications of the VM. The following minimum specifications are recommended for the Foldr appliance that is going to be hosting the search role:
2 vCPU
4GB RAM
If you provide more CPU / RAM resources to the search appliance beyond the specification above, the crawl process will, within reason, consume most of the resources it is provided with during an indexing operation. The above specification is the recommended minimum for Search to operate correctly.
This article will describe configuring two Foldr appliances. One will act as our primary client access/infrastructure (database) appliance, and the other our Search appliance. In an existing installation, the primary appliance is the virtual machine that is currently being accessed by users, however, with version 2 Search it is vital that the Search appliance is set to use the same backend configuration database as the primary appliance. This was not a requirement with the deprecated v1 search feature.
Ensuring both appliances are using the same backend configuration database
To allow version 2 Search to function correctly, it must be able to read the main configuration database from the primary (or other appliance). To do this:
This should be done on the CLIENT ACCESS/PRIMARY Appliance:
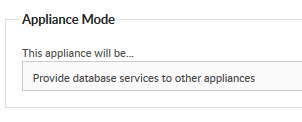
1. Log into Foldr Settings >> Infrastructure tab >> Configuration >> Appliance Mode to:
Provide database services to other appliances
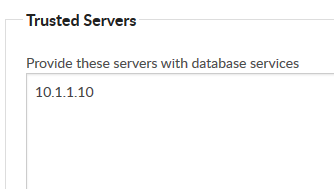
2. Enter the IP address of the SEARCH appliance into the box labelled ‘Trusted Servers’
3. Navigate to the Keys tab and make a note of the Hashing Salt, this will be required later
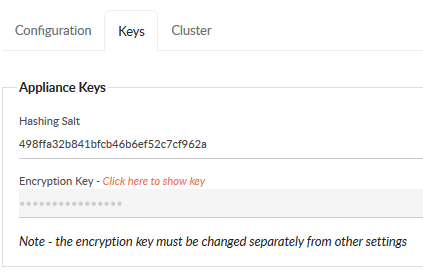
4. Click the orange text link in the keys tab to reveal the current Encryption Key and supply the fadmin password in the pop-up dialog.

5. Make a note of the Encryption Key, this will be required later.
The following should be done on the SEARCH appliance:
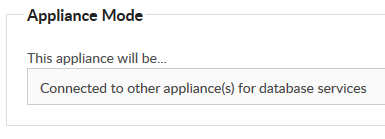
6. Log into Foldr Settings >> Infrastructure tab >> Configuration >> Appliance Mode to:
Connected to other appliance(s) for database services
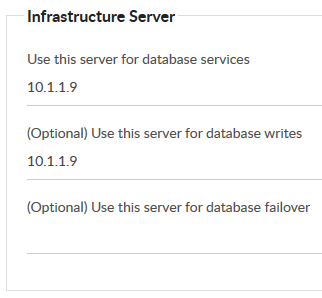
7. Enter the IP address of the CLIENT ACCESS/PRIMARY DB appliance in the two fields labelled:
- Use this server for database services
- (Optional) Use this server for database writes
8. Click the Keys tab and copy/paste the Hashing Salt from the CLIENT ACCESS\PRIMARY DB appliance. Click SAVE CHANGES.
9. Copy / paste the Encryption Key from the CLIENT ACCESS\PRIMARY DB appliance. Click SAVE CHANGES.
NOTE – You must not change both the Hashing Salt and the Encryption Key at the same time (with one Save action) as the encryption key will not be saved successfully.
Confirm database accessibility
The Search appliance should now be able read/write the database hosted on the primary Clicking the General tab or Shares should confirm that the configuration (licence keys, service accounts, shares etc) is now being read from the Primary appliance. Configuration changes can be made on either appliance and they will be reflected on the other system immediately.
Confirm LDAP/Active Directory is searchable
Test that the Search appliance is able to search Active Directory by trying to search for users or groups anywhere in the Foldr Settings web admin UI (Security > Use Foldr or Files & Storage > Search & Data > Search Settings > Crawl As is ideal for this). If domain users and groups can be displayed, all is well – This test confirms that the encrpyption keys match between the client access/database and search appliances.
Enabling the search index service
The following should be done on the SEARCH appliance
Within Foldr Settings, navigate to Files & Storage > Search and enable the Index Service.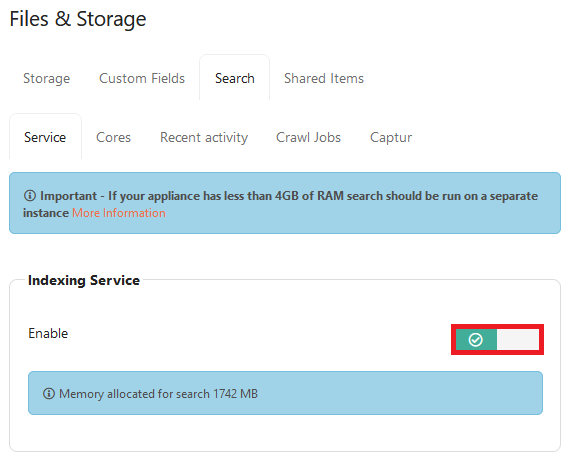
Specify other Foldr appliances (Trusted Servers)
This should be done on the Search Appliance
Enter the IP address of all Foldr appliance(s) that will be using search (including the search server itself) within the Trusted Servers field, one per line.
This will change the configuration of the built-in firewall to allow connections from these IP addresses.

Creating a Search Core
This should be done on the Search Appliance
A ‘Core’ can be thought of as a container that holds both the configuration and the index files for one or more share paths (URIs).
Whilst the search function can host multiple cores with numerous share URIs in each, it is generally recommended to configure a single core with all share URIs within it.
On a multi-tenant installation, you should use one core per tenant.
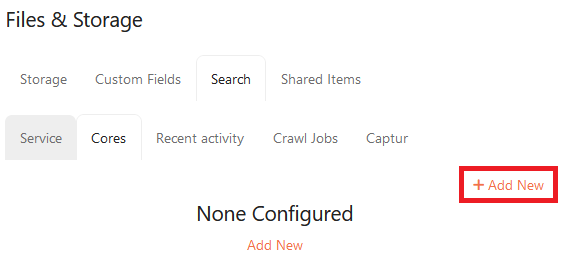
1. To create a core, click the Cores tab >> + Add Core
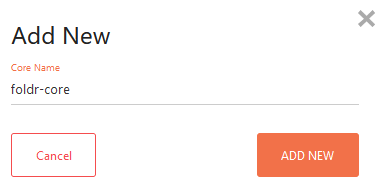
2. Give the Core a suitable name and click ADD CORE.
3. An empty core will be created

Enabling Search for SMB shares
This should be done on the Search appliance
1. You should now populate the core with shares to be indexed by Foldr search. To do this, navigate to Foldr Settings >> Files & Storage and edit a share (double click the share to edit)
2. Click the Search tab and enable the toggle labelled ‘Show as location in Search?‘
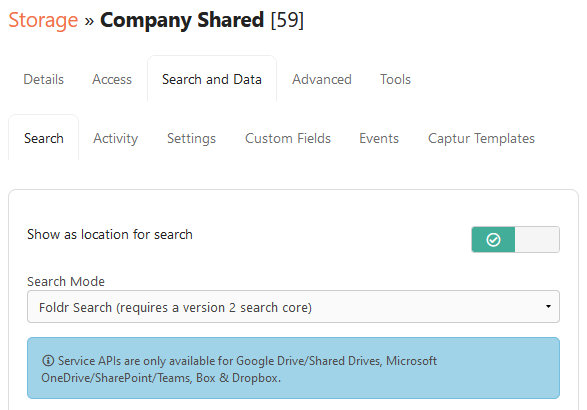
3. Ensure that the Search mode is set to ‘Foldr Search (requires a version 2 search core)’
4. Populate the address and core name within the box labelled ‘Use this host for search services’ – This should point to the Search appliance
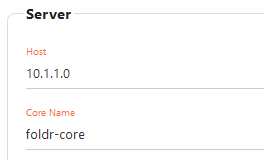
5. Navigate to the Permissions & Access tab in the Share configuration screen and select a suitable service account that has at least read permission to the share and all data contained within it.
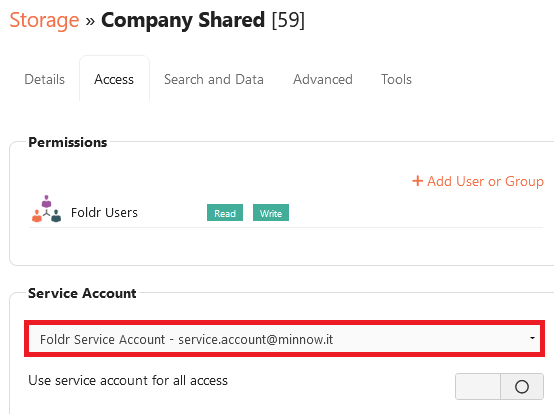
6. Click SAVE CHANGES
Enabling Search for Office 365 locations (Indexed by Foldr)
To enable search for OneDrive, SharePoint or Teams locations that are to be indexed by Foldr’s crawler (rather than use the cloud service API) enable search as a location following the same steps as shown above for SMB shares.
Enter the host address of the server running the Search index service and configure the
IMPORTANT – Service accounts are not required where manual account linking is being used.
Configure the Crawl As option in the search settings either with a suitable group or user account.
Crawl As – Considerations when crawling SharePoint or Teams (Manual Account Linking)
If you configure a SharePoint site with a ‘Crawl as’ group and the group contains 50 users. The Foldr server will have to crawl and index the entire site 50 times, once for each user in the group in order to return search results. This may take a considerable amount of time, depending on the amount of data hosted on that site.
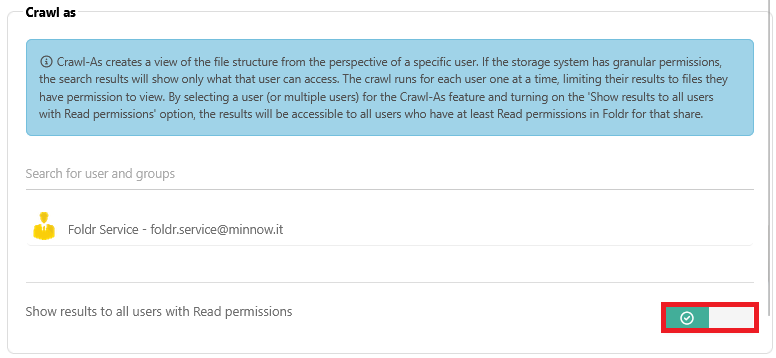
Show results to all users with Read permissions
Where the SharePoint site does not contain subfolder granular permissions inside the site, an option is available to the administrator to return search results to all users that have read access to the location in Foldr. Using this option, the administrator can crawl the SharePoint site as a single user (so it is crawled only once) and search results are shown to all users.
This option is labelled Show results to all users with Read permissions and is accessible in Foldr Settings > Files & Storage > Edit-share > Search & Data > Settings > Crawl Jobs
Using deltas to track changes made in OneDrive and SharePoint outside of Foldr
Foldr provides support for using delta queries to quickly index and track changes made to OneDrives or SharePoint sites / document libraries More information on deltas is available here.
Scheduling the Index Operations
Within the Foldr Settings >> Files & Storage >> Search & Data >> Settings tab you can select a suitable schedule from daily, weekly or monthly options to crawl the share, however more granular scheduling is available using the Cron option.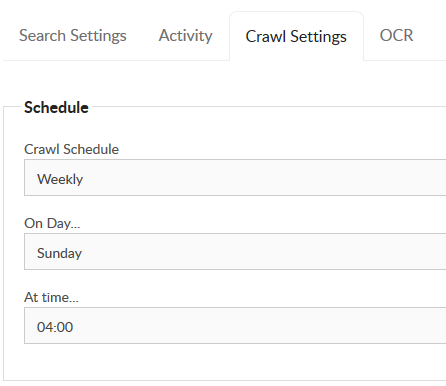
Using Cron for advanced scheduling
Using the Cron option, it is possible to configure granular schedules. Example Cron syntax is shown in the graphic below:
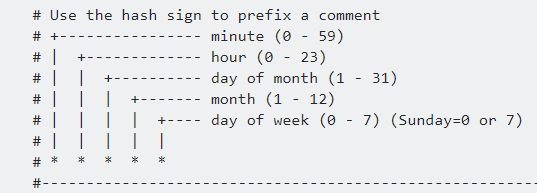
As an example, to crawl a URI every Monday, Wednesday and Friday at 8pm you would use:

‘Crawl As’ vs ‘Indexing ACLs’ (Permissions)
In most cases, ‘Crawl As’ is used on personal shares such as Active Directory home folders where the %username% storage address is used on the share. Crawl As may also be used on cloud storage such as OneDrive, Google Drive if you select to index these locations with Foldr rather than use the cloud service API.
Crawl As creates a view of the file structure from the perspective of a specific user. If the storage system has granular permissions, the search results will show only what that user can access. The crawl runs for each user one at a time, limiting their results to files they have permission to view. By selecting a user (or multiple users) for the Crawl-As feature and turning on the ‘Show results to all users with Read permissions’ option, the results will be accessible to all users who have at least Read permissions in Foldr for that share.
Using Crawl As, allows Foldr to resolve storage paths for each user in turn (i.e. If a group is specified, the user accounts in this group is pulled from Active Directory and each user’s storage location is index as required. When using Crawl As, the administrator would typically enter one or more security groups that contains users whose home folders you wish to index. NOTE Domain Users and other ‘built-in’ Windows server groups should not be used.
Indexing ACLs only applies to SMB shares should generally used on common network shares that contain granular subfolder / file permissions.
Crawl As and Indexing ACLs are mutually exclusive options when configuring the search feature on an SMB Share. If the share being indexed is ‘flat’ in that all users have the same level of access to it’s contents, you do not need to enable Index ACLs or use Crawl As
Recommended settings for SMB Home Folders (%homefolder%)
Where SMB shares are configured in Foldr Settings > Files & Storage using the %homefolder% variable (to dynamically get the users home folder from the Active Directory homeDirectory attribute / profile tab in ADUC) the following should be configured.
Crawl Settings:
1. Crawl As – Select one or more Active Directory Security Group that contains users that the share applies to – NOTE Domain Users and other ‘built-in’ groups should not be used.
2. Index ACLs – toggle should be disabled
A suitable service account should be selected on the share within the Permissions & Access tab that has permission to read the data being indexed.
Recommended settings for central/common shares (SMB)
Common network shares that have flat permission structure (no granular permissions)
Crawl Settings:
1. Crawl As – should be unconfigured
2. Index ACLs – toggle should be disabled
Common network shares that contain files/folders with granular permissions
Crawl Settings:
1. Crawl As – should be unconfigured
2. Index ACLs – should be enabled
A suitable service account should always be selected on the share within the Access tab that has permission to read the data being indexed.
Searching Cloud services (OneDrive, SharePoint Online, Google Drive etc)
Foldr is able to either index these locations itself, or alternativaly use the cloud providers search API directly or crawl/index cloud locations. On shares using cloud storage environment variables for the Storage Address (%onedrive%, %googledrive%, %sharepoint% and so on) you can select the required mode within the Search & Data tab:
Using the cloud provider’s search API (no indexing required)
Note this option does not use the search appliance as no indexing takes place and all search queries are performed ‘live’ against the relevant cloud provider. Using the cloud providers API will provide basic search capabilities but certain features (indexing ACLs, file content, scheduling, OCR and so on) may not apply. Some search terms/queries may not be supported.
To configure:
1. Edit the Share in question (OneDrive, Google Drive etc) in Foldr Settings > Files & Storage
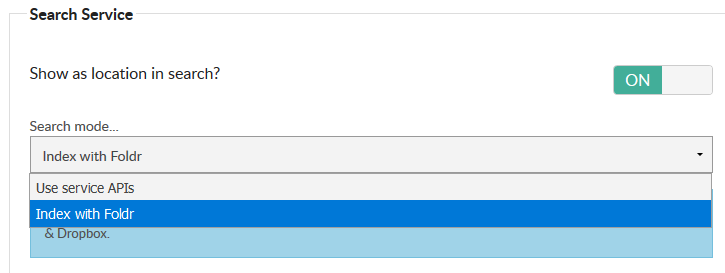
2. Select the Search & Data tab, enable ‘Show as location in Search’ and select ‘Use service APIs‘ from the search mode drop-down menu.
3. Click SAVE CHANGES
All other search settings should be left unconfigured.
Indexing cloud services with Foldr
All cloud services that Foldr can present to a user, may be indexed and stored in the Search appliance. This allows Foldr to index file content, schedule crawls and use the same search terms/queries as on-premise shares.
To Configure:
1. Edit the Share in question (OneDrive, Google Drive etc) in Foldr Settings > Files & Storage
2. Select the Search & Data tab and select ‘Index with Foldr‘

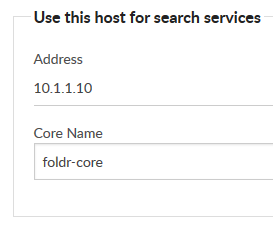
3. The search host and core name should be configured
1. Crawl As.. Specify an Active Directory Security Group that contains all users that the share applies to
2. Index ACLs toggle should be disabled
All other Search options can be configured as required.
Indexing File Content
By default Foldr search will index file and folder names only. To index textual content found in common Office formats, PDF, TXT and RFT enable the ‘Index file contents‘ toggle inside Search and Data > Settings > Content Extraction tab.
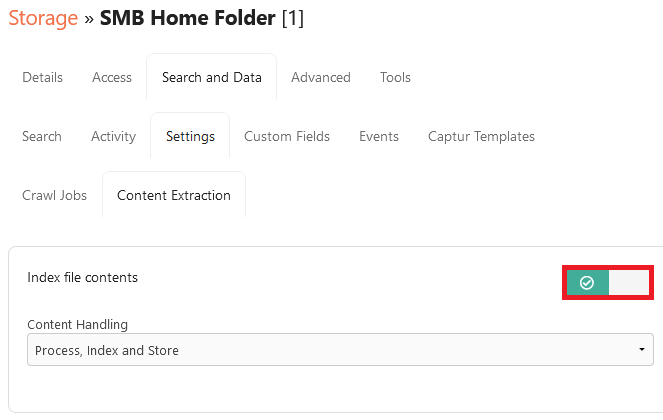
Note – The Content Handling modes are explained further down the article.
A predefined list of file formats will be displayed that covers PDFs, images and Office documents (modern and legacy). This list can be modified as neccessary.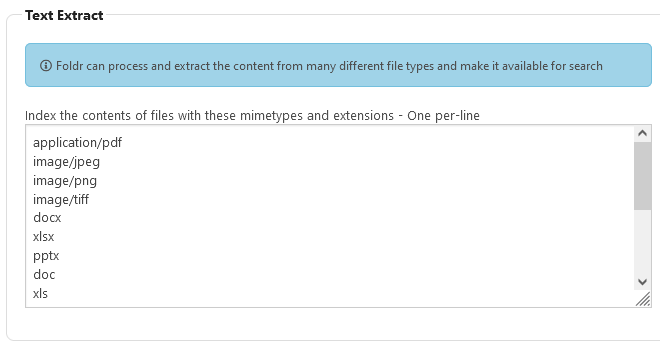
Optical Character Recognition (OCR)
During an index crawl job Foldr can optionally process image files (jpg, png and gif) or graphical PDF documents with either the built-in OCR engine or cloud APIs (provided by either AWS Textract or Google Vision) to extract text which is then stored inside the Search index. This text is then searchable by the user.
Note – OCR is not required to index the contents of Office, PDF or other textual files. OCR only applies to extracting text from images, or images inside files.
An example use case, with OCR enabled, would be a user could searching for an invoice number on a scanned document and being able to locate the specific invoice number file on the network quickly.
Enabling the OCR feature (Built-in OCR Engine)
1. Edit the storage item required under Files and Storage > Search and Data > Settings > Content Extraction, firstly ensure ‘Index file contents‘ toggle is enabled
2. Scroll down to the OCR section and enable the toggle labelled Enable OCR
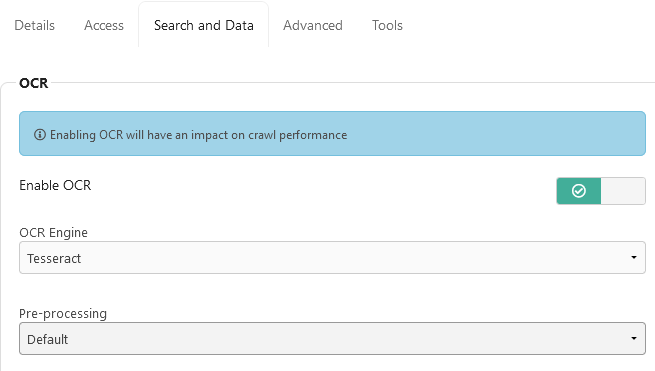
Click Save Changes to confirm the changes.
Enabling OCR (AWS Textract)
A dedicated KB article is available to setup AWS Textract OCR. This is available here
OCR Language Support
By default Foldr will use English language only, however the administrator can enable the following languages if required: Danish, Dutch Flemish, Finnish, French, German, Norwegian, Spanish, Swedish, Portuguesem, Chinese Simple and Traditional.
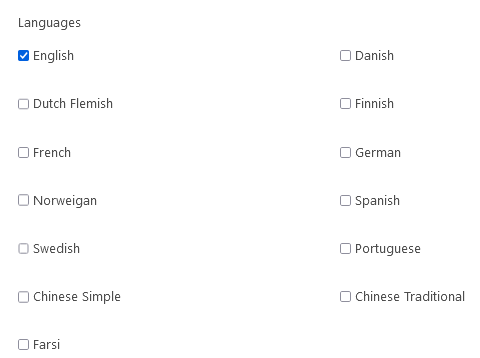
If additional language support is required that is not listed, contact support@foldr.io
Exclusions
Within the Exclusions section in Search Settings the administrator can exclude certain file types or files / folders matching certain naming patterns using wildcards (*) from the index. Foldr has pre-defined exclusions for common files that are not usually of interest to a user (such as temporary, system generated or .dsstore files and so on) and additional exclusions can be entered one per line. If the exclusion contains a / it is assumed to be a directory rather than a file.
Example syntax:
temp.docx – Excludes any file called temp.docx from the index
*.png – Excludes all PNG files from the index
*temp* – Excludes all files containing ‘temp’ in the file name
*Temp*/* will exclude any directories called Temp (and also exclude all subdirectories / files within)
File Content Indexing – Content Handling Modes
Process, index and store
Content is extracted, Captur/fields are processed and sent to index. Solr stores the entire content and HOCR data to allow for snippets and hit-highlighting.
Process and index
Content is extracted, Captur/fields are processed and sent to index. No snippets or hit-highlighting available.
Process only
Content is extracted but is only available at point of index for Captur processing (storing to custom fields)
Deploying a Single Server for both Foldr and Search
While it is not considered optimal, it is possible to run Foldr (for users) and have the search index service running on on a single Foldr appliance. Due to search being a resource hungry feature, the minimum specification of a single Foldr server deployment should be increased to 4 vCPU and 8GB RAM. By default the server will reserve 2GB of system RAM for non-search related functions, however in this single server scenario, 2GB may be insufficient when users are directly interacting with it for other Foldr functions. As a result the internal memory reservation should be increased to 4GB by running the following console command:search-reserve-mem 4
It is not necessary to run the above command if a separate / dedicated search appliance is being deployed.