Deploying the Windows app with Group Policy
Windows Server uses Group Policy to manage software and client settings for both users and computers bound to the Active Directory domain. A feature of Group Policy is software installation and this can be used to deploy the Foldr for Windows app to domain bound Windows clients.
System Requirements
Windows 10 or 11 (x64 or ARM64)
Visual C++ 2015 runtime – 14.0.24215 is required or higher (latest is recommended) *
.Net Framework 8 Desktop runtime *
* These components must be installed on the Windows client before deploying the Foldr application with Group Policy
IMPORTANT – Upgrading from version 3.x to 4.x
Version 4 (released August 2025) is a major upgrade from previous v3.x releases where the app migrates from Legacy .Net Framework 4.8x to .Net 8. To upgrade successfully between these versions a Windows client must first have v3.11.0 installed. It is not possible to upgrade a client running Foldr v3.8.0 or earlier to 4.x.
v3.11.0 MSI can be downloaded here:
x64 – https://foldr.com/updates/win/3.11.0/FoldrSetup-x64.msi
As well as running 3.11.0, there are new prerequisite requirements for the v4 app which are listed below.
Prerequisites
The prerequisites below are installed automatically when the .EXE, .INTUNEWIN or Winget installers are used. When Foldr is deployed using the .MSI, these must be installed manually before the Foldr app is installed.
Visual C++ 2015-2022 runtime
The latest Visual Studio C++ runtime 2015-2022 package must be installed on the Windows 10/11 client before you install the Foldr app. This is available here:
x64 – https://aka.ms/vs/16/release/vc_redist.x64.exe
ARM64 – https://aka.ms/vs/17/release/vc_redist.arm64.exe
The following article may be useful in deploying the C++ runtime package using Intune.
**.Net Framework 8 Desktop runtime
**
The .Net Framework 8 desktop runtime package must be installed on the Windows 10/11 client before you install the latest Foldr app. This is available here (x64):
Other installers (ARM64) are available here:
https://dotnet.microsoft.com/en-us/download/dotnet/8.0
Foldr .MSI Download Links
The latest version of the app can be downloaded here:
x64 – https://foldr.com/downloads/clients/win/x64/latest.zip
ARM64 – https://foldr.com/downloads/clients/win/ARM64/latest.zip
Automatic App Startup
By default, the Foldr MSI will not configure the app as a startup application in Windows. This can be achieved using an MST transforms file when configuring the app in Group Policy Management or using installation arguments if scripting the installation using some other deployment method, or running msiexec manually.
See here further down this article for more information.
App Update Considerations
IMPORTANT – When deploying the app via Group Policy, it is important that you DISABLE the ability for users to update the app and control all updates using Group Policy instead. This is achieved by pushing out a registry key (UpdatesEnabled) as described here:
Installing the app with Group Policy
The recommended method of deploying the app with Group Policy is given below:
1. Ensure the Windows client has the two prerequisite packages (above) installed.
2. Download the latest Foldr setup .MSI using the .zip link below:
x64 – https://foldr.com/downloads/clients/win/x64/latest.zip
3. Extract the zip file. If you are attempting to install app version 1.2.0 rename the FoldrSetup.msi to ‘setup.1.2.0.msi’ and place it into an suitable SMB share on the network.
4. Open the Group Policy Management Console (GPMC). Create and link a new GPO on the Organisational Unit that contains the Windows clients that are to receive the Foldr app; or edit an existing policy if one for software installs. Edit the policy.
5. Browse to Computer Configuration >> Policies >> Software settings >> Software installation. Add a new item by right clicking on the main pane >> New >> Package.
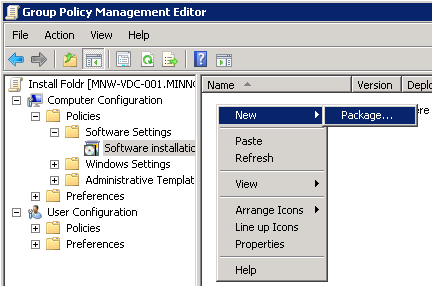
6. Browse to the location of the .msi file using the network UNC path (for example \\server\share\setup.1.2.0.msi) and select the .msi to be installed on the clients.
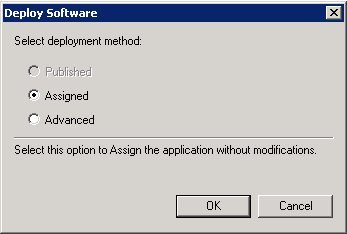
7. Use the default ‘Assigned’ deployment type and click OK to confirm.
8. The app will appear in the main panel showing the application name, version and path.

The basic deployment steps are now complete. When the Windows clients next reboot and they are connected to the network the Foldr app will be installed automatically.
Upgrading the Foldr app
The administrator can manage Foldr updates through Group Policy by adding and removing the MSI item from a GPO applied to domain bound workstations.
IMPORTANT – It is vital that the app is not uninstalled between upgrades as this will cause issues with the file system driver, unless the workstation is rebooted between installations. Failure to restart the computer between installations will result in file system driver issues and the drive may fail to mount when the app is signed in.
To upgrade the Foldr for Windows app on the Windows clients – In this example we will upgrade from 1.2.8 to 1.3.0:
1. Download the latest Foldr for Windows .msi using the download links below:
x64 – https://foldr.com/downloads/clients/win/x64/latest.zip
ARM64 – https://foldr.com/downloads/clients/win/arm64/latest.zip
2. Extract the zip file. If you are intending to upgrade to app version 1.3.0 rename the FoldrSetup.msi to ‘setup.1.3.0.msi’ and place it into a suitable share on the network.
3. Edit the relevant software installation GPO in Group Policy Management and navigate to _Computer Configuration >> Policies >> Software settings >> Software installation
_
4. Remove the existing v1.2.8 Foldr app listed in the main panel by right clicking >> All Tasks >> Remove
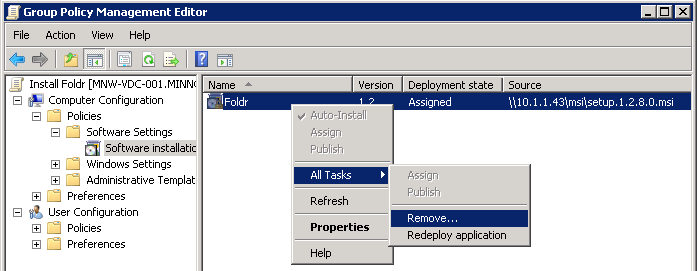
5. Select ‘Allow users to continue to use the software, but prevent new installations‘ (bottom option) so that the existing Foldr application is not uninstalled from the clients. Click OK.

IMPORTANT – The administrator should never need to select ‘Immediately uninstall the software from users and computers‘ unless the intention is to remove Foldr from the workstation and no reinstall is required. Where a reinstall is required, the computer must be restarted before the new version is deployed.
6. The app will be removed from view in the Group Policy Management Console. Add a new application by using the context menu >> New >> Package.
7. Browse to the location of the .msi file using it’s UNC path (\\server\share\setup.1.3.0.msi) and select the upgrade .msi to be installed on the clients.
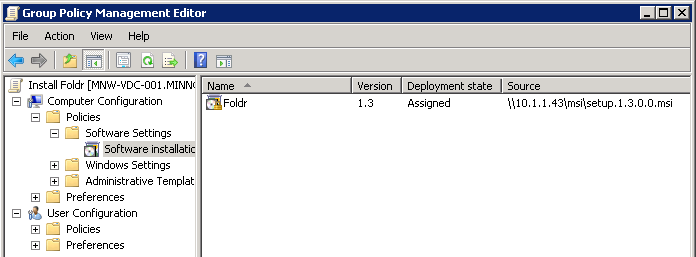
The upgrade steps are now complete. When the Windows clients next reboot, and they are connected to the network, the Foldr app will upgraded automatically retaining the installation settings / configuration options that are already in place.
Migrating manually installed clients to centrally managed with Group Policy
If the administrator has manually installed the Foldr client on Windows clients, you can simply migrate/upgrade to a managed installation by following the same installation steps as given above. Any existing app configuration will be retained.
App Startup and Desktop Shortcut Creation
By default, the MSI does not create all users a desktop shortcut icon and the Foldr app is not configured in Windows as a startup app (meaning it doesn’t run automatically when a user logs into their Windows desktop)
To achieve this when using an MSI, an administrator can either specify installation arguments at the time of installation – as shown below:
ALL_USERS_STARTUP=1
DESKTOP_SHORTCUT=1
msiexec -i FoldrSetup.msi /quiet ALL_USERS_STARTUP=1 DESKTOP_SHORTCUT=1
When deploying applications using Group Policy, it is not possible to use installation arguments. Instead you can specify an transforms file to modify the MSI installation to achieve the same result. This is detailed below.
MST Transforms file for app startup and desktop shortcut creation
An MST transforms file is available for Foldr v4.8.0 and higher when deploying the Foldr MSI to x64 and arm64 devices. This will modify the installation to configure Foldr as a startup app in Windows and all users will have a Foldr desktop icon.
To apply the MST file during installation, first download and copy the MST file to a shared location (where the Foldr MSIs is hosted is ideal)
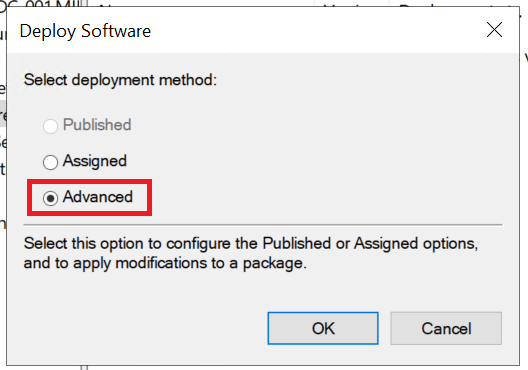
Create a new package in Group Policy
Select Advanced
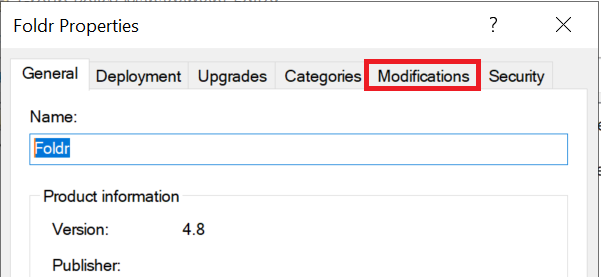
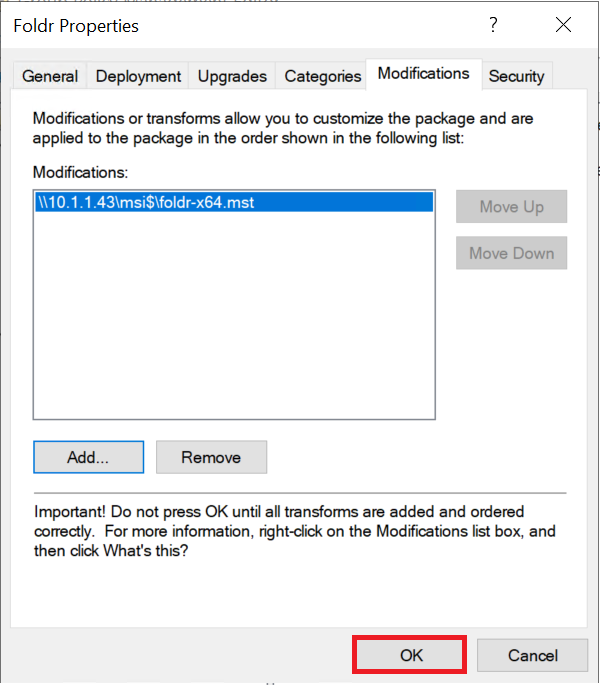
Select the Modificiations tab
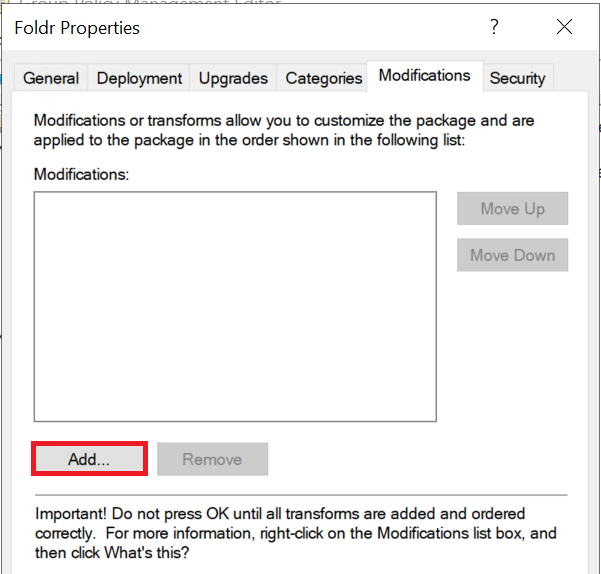
Click Add
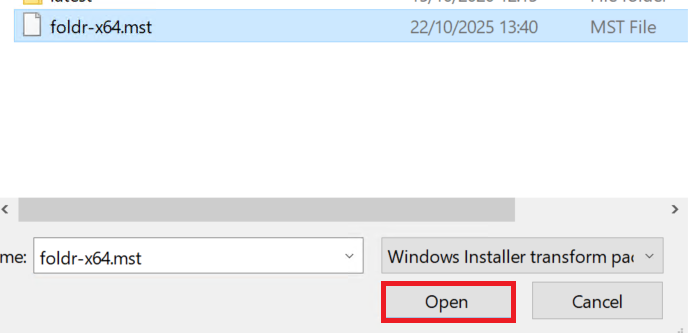
Browse to the share hosting the MST transforms file, select it and click Open
Click OK
When clients now install the MSI, the transforms file will be automatically applied and the Foldr app will be set as a startup app and the desktop shortcut will be created.
To use the transforms file manually with MSIEXEC, an example is given below:
msiexec /i "FoldrSetup.msi" TRANSFORMS="foldr-x64.mst" /quiet
Configuring the Foldr app with Group Policy Preferences
There are various aspects on the Foldr app that can be configured by the administrator such as the Foldr server address, drive mode, cache settings, security options and so on.
These options available and the details for each are documented in the following KB article:
https://kb.foldr.io/foldr-support/msi-options-silent-installation/
MSI Install Options
| Option | Value | Registry Key |
|---|---|---|
| FOLDR_SERVER | eg. “my.foldr.server” | FoldrServer |
| REQUIRES_ANTIVIRUS | 1 or 0 | RequiresAntivirus |
| AV_UPDATE_GRACE_MINUTES | Any numeric value | AVUpdateGraceMinutes |
| AV_GRACE_MINUTES | Any numeric value | AVGraceMinutes |
| DETECT_RENAME_THREAT | 1 or 0 | DetectRenameThreat |
| DETECT_EXTENSIONS_THREAT | 1 or 0 | DetectExtensionsThreat |
| FOLDR_DRIVE | eg “Z:” | FoldrDrive |
| DRIVE_TYPE_REMOVABLE | 1 or 0 | DriveTypeRemovable |
| USER_CAN_CHANGE_DRIVE_TYPE | 1 or 0 | UserCanChangeDriveType |
| USER_CAN_CHANGE_DRIVE_LETTER | 1 or 0 | UserCanChangeDriveLetter |
| SHARES | eg: “1,2,10” | EnabledShares |
| UPDATES_ENABLED | 1 or 0 | UpdatesEnabled |
| SIGN_OUT_ON_EXIT | 1 or 0 | SignOutOnExit |
| SSO_LOGIN_BY_DEFAULT | 1 or 0 | SSOLoginByDefault |
| SERVER_OS_USING_DRIVE | eg “Z:” | See details below |
| CACHE_EXPIRY_DAYS | 1, 5, 7, 14 or 28 | CacheExpiryDays |
| CERTIFICATE_PROMPTS | 1 or 0 | CertificatePrompts |
| UPLOAD_NOTIFICATIONS | 1 or 0 | UploadNotifications |
| SHOW_WINDOWS_SHORTCUTS | 1 or 0 | ShowWindowsShortcuts |
| OFFICE_AUTO_CHECKOUTS | 1 or 0 | OfficeAutoCheckouts |
| OFFICE_ASSIST | 1 or 0 | OfficeAssist |
| USE_MY_FILES | 1 or 0 | UseMyFiles |
| OPEN_DRIVE_AT_STARTUP | 1 or 0 | OpenDriveAtStartup |
| CLEAR_CACHE_ON_EXIT | 1 or 0 | ClearCacheOnExit |
| SSO_AUTO_SIGN_IN | 1 or 0 | SSOAutoSignIn |
| PROMPT_AT_STARTUP | 1 or 0 | PromptAtStartup |
| MAX_UPLOADS | 1,2,3,4 or 5 | MaxUploads |
| NO_CACHE_MSI | 1 or 0 | Not stored in registry |
| EXCESSIVE_DOWNLOAD_ALERTS | 1 or 0 | ExcessiveDownloadAlerts |
| OFFICE_ASSIST | 1 or 0 | OfficeAssist |
| OFFICE_ASSIST_ALLOW_OPEN | 1 or 0 | OfficeAssistAllowOpen |
| PRESERVE_WFR_ON_SIGN_OUT | 1 or 0 | PreserveWFROnSignOut |
| ADMIN_UPDATES | 1 or 0 | AdminUpdates |
| PROXY | http://proxy-address:port | Proxy |
| USER_CAN_CHANGE_PROXY | 1 or 0 | |
| This option must be set to 0 for the ‘Proxy’ option to be used | UserCanChangeProxy |
On a manual installation, to configure the app at the time of installation the administrator would typically run the MSI using the msiexec utility and append various options. These options would in turn write registry keys in HKEY_LOCAL_MACHINE > Software > Foldr > Default to provide global settings for any user that uses the Foldr app/drive.
The app can be configured in a managed installation easily using Group Policy Preferences (GPP) to write the registry keys and apply these onto client machines. Note – the app doesn’t even need to be installed via Group Policy, an administrator could use GPP to modify the configuration of the Foldr app on machines that had the software installed manually.
1. Create a new GPO or edit an existing policy that would apply to the Windows clients in Group Policy Management Console.
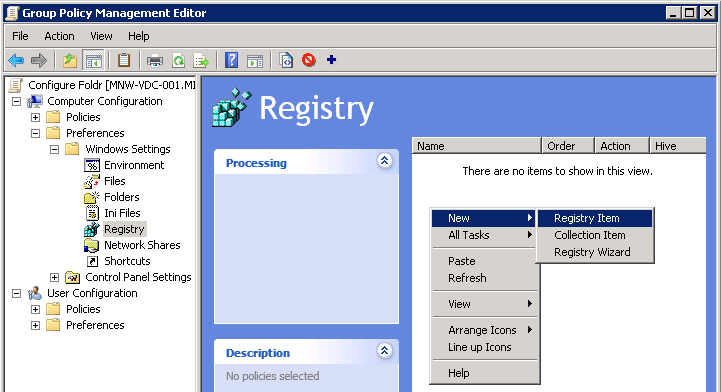
2. Navigate to _Computer Configuration >> Preferences >> Windows >> Registry
_
3. Create a new Registry Item from the context menu.
_
_
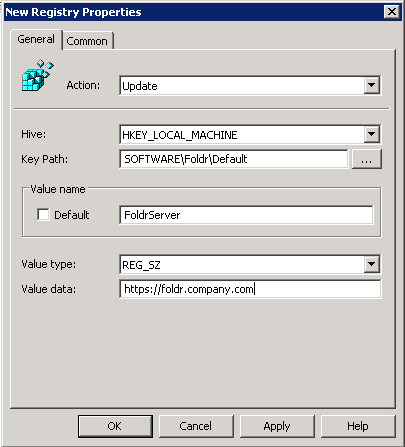
4. Configure example the item as shown below
Action = Update
Hive = HKEY_LOCAL_MACHINE
Key Path = SOFTWARE\Foldr\Default
Value name = Registry Key (see table above)
Value type = REG_SZ
Value data = (1|0 / string etc – see table above)
Click OK and create as many registry items as required to configure the app to your requirements.
Configuring the Foldr app to startup automatically
The Foldr app when installed by MSI is not configured as a startup app. To configure Foldr to start automatically, this can be done by Group Policy:
1. Create a new GPO in Group Policy Management and apply to your workstations, or edit an existing one and configure:
Computer Configuration\Administrative Templates\System\Logon\Run These Programs at User Logon
2. Enable this setting and click the Show button.
3. Configure an entry for Foldr here:
C:\Program Files\Minnow IT\Foldr\Foldr.exe
4. Click OK, and when this policy next applies to your systems the Foldr app should launch automatically on sign in. This will affect all users that sign into the computers that have the policy applied.